Building a Basic Scene
Note: This documentation is for the old 0.9.0 version of A-Frame. Check out the documentation for the current 1.8.0 version
Let’s start by building a basic A-Frame scene. For this, we will need a basic understanding of HTML. We will learn how to:
- Add 3D entities (i.e., objects) with primitives
- Transform to transform entities in 3D space with position, rotation, scale
- Add an environment
- Add textures
- Add basic interactivity using animations and events
- Add text
Remix the Basic Guide example on Glitch.
Starting with HTML
We start out with a minimal HTML structure:
<html> |
We include A-Frame as a script tag in the <head>, pointing to the A-Frame
build hosted on a CDN. This has to be included before <a-scene> because
A-Frame registers custom HTML elements which must be defined before <a-scene>
is attached or else <a-scene> will do nothing.
Next, we include <a-scene> in the <body>. <a-scene> will contain every
entity in our scene. <a-scene> handles all of the setup that is required for
3D: setting up WebGL, the canvas, camera, lights, renderer, render loop as well
as out of the box WebVR support on platforms such as HTC Vive, Oculus Rift,
Samsung GearVR, and smartphones (Google Cardboard). <a-scene> alone takes a
lot of load off of us!
Adding an Entity
Within our <a-scene>, we attach 3D entities using one of A-Frame’s standard
primitives <a-box>. We can use <a-box> just like a normal HTML element,
defining the tag and using HTML attributes to customize it. Some other examples
of primitives that come with A-Frame include <a-cylinder>, <a-plane>, or
<a-sphere>.
Here we define the color <a-box>, see <a-box>‘s documentation for
the more attributes (e.g., width, height, depth).
 Image by Ruben Mueller from vrjump.de
<a-scene> |
As a side note, primitives are A-Frame’s easy-to-use HTML elements that wrap
the underlying entity-component assembly. They can be convenient, but
underneath <a-box> is <a-entity> with the geometry and
material components:
<a-entity id="box" geometry="primitive: box" material="color: red"></a-entity> |
However, because the default camera and the box are positioned at the default
position at the 0 0 0 origin, we won’t be able to see the box unless we move
it. We can do this by using the position component to transform the
box in 3D space.
Transforming an Entity in 3D
Let’s first go over 3D space. A-Frame uses a right-handed coordinate system. With the default camera direction: positive X-axis extends right, positive Y-axis extends up, and the positive Z-axis extends out of the screen towards us:
 Image from what-when-how.com
A-Frame’s distance unit is in meters because the WebVR
API returns pose data in meters. When designing a scene for VR, it is
important to consider the real world scale of the entities we create. A box with
height="10" may look normal on our computer screens, but in VR the box will
appear massive.
A-Frame’s rotational unit in A-Frame is in degrees, although it will get internally converted to radians when passing to three.js. To determine the positive direction of rotation, use the right-hand rule. Point our thumbs down the direction of a positive axis, and the direction which our fingers curl around the positive direction of rotation.
To translate, rotate, and scale the box, we can change the position, rotation, and scale components. Let’s first apply the rotation and scale components:
<a-scene> |
This will rotate our box at an angle and double its size.
Parent and Child Transforms
A-Frame HTML represent a 3D scene graph. In a scene graph, entities can have a single parent and multiple children. Child entities inherit transformations (i.e., position, rotation, and scale) from their parent.
For example, we could have a sphere as a child of a box:
<a-scene> |
If we calculate the sphere’s world position, it would be 1 2 3, achieved by
composing the sphere’s parent position with its own position. Similarly, for
rotation and scale, the sphere would inherit the box’s rotation and scale. The
sphere too would be rotated and stretched just as like its parent box. If the
box were to change its position, rotation, or scale, it would immediately apply
to and affect the sphere.
If we were to add a cylinder as a child to our sphere, the cylinder’s transform would be affected by both the sphere’s and box’s transforms. Under the hood in three.js, this is done by multiplying transformation matrices together. Fortunately, we don’t have to think about that!
Placing our Box in Front of the Camera
Now let’s get back to making our box visible to the camera from the start. We can move the box back 5 meters on the negative Z-axis with the position component. We also have to move it up 2 meters on the positive Y-axis so the box doesn’t intersect with the ground since we scaled the box and scaling happens from the center:
<a-scene> |
Now we see our box!

Default Controls
For flat displays (i.e., laptop, desktop), the default control scheme lets us
look around by click-dragging the mouse and move around with the WASD or
arrow keys. On mobile, we can pan the phone around to rotate the camera.
Although A-Frame is tailored for WebVR, this default control scheme allows
people to view scenes without a headset.

Check out the instructions on the Mozilla VR homepage for setting up and entering WebVR.
Upon entering VR by clicking the goggles icon with a VR headset connected (e.g., Oculus Rift, HTC Vive), we can experience the scene in immersive VR. If room-scale is available, we can physically walk around the scene!
Adding an Environment
A-Frame allows developers to create and share reusable components for others to easily use. @feiss‘s environment component procedurally generates a variety of entire environments for us with a single line of HTML. The environment component is a great and easy way to visually bootstrap our VR application, providing over a dozen environments with numerous parameters:
First, include the environment component using a script tag after A-Frame:
<head> |
Then within the scene, add an entity with the environment component attached.
We can specify a preset (e.g., forest) with along many other parameters
(e.g., 200 trees):
<a-scene> |
Applying an Image Texture
Make sure you’re serving your HTML using a local server for textures to load properly.
We can apply an image texture to the box with an image, video, or <canvas>
using the src attribute, just like we would with a normal <img> element.
We also should remove the color="red" that we set so that the color doesn’t
get blended in with the texture. The default material color is white, so
removing the color attribute is good enough.
<a-scene> |
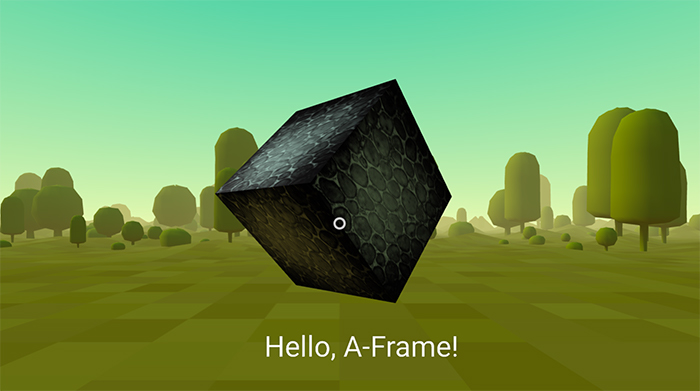
Now we’ll see our box with an image texture pulled from online:

Using the Asset Management System
However, we recommend using the asset management system for performance. The asset management system makes it easier for the browser to cache assets (e.g., images, videos, models) and A-Frame will make sure all of the assets are fetched before rendering.
If we define an <img> in the asset management system, later three.js doesn’t
have to internally create an <img>. Creating the <img> ourselves also gives
us more control and lets us reuse the texture across multiple entities. A-Frame
is also smart enough to set crossOrigin and other such attributes when
necessary.
To use the asset management system for an image texture:
- Add
<a-assets>to the scene. - Define the texture as an
<img>under<a-assets>. - Give the
<img>an HTML ID (e.g.,id="boxTexture"). - Reference the asset using the ID in DOM selector format (
src="#boxTexture").
<a-scene> |
Creating a Custom Environment (Optional)
Previously we had the environment component generate the environment. Though it’s good to know a bit on creating a basic environment for learning purposes.
Adding a Background to the Scene
We can add a background with <a-sky> that surrounds the scene.
<a-sky>, which is a material applied to the inside of a large sphere, can be
a flat color, a 360° image, or a 360° video. For example, a dark gray
background would be:
<a-scene> |
Or we can use an image texture to get a 360° background image by using
src instead of color:
<a-scene> |
Adding a Ground
To add a ground, we can use <a-plane>. By default, planes are
oriented parallel to the XY axis. To make it parallel to the ground, we need to
orient it along the XZ axis. We can do so by rotating the plane negative
90° on the X-axis.
<a-plane rotation="-90 0 0"></a-plane> |
We’ll want the ground to be large, so we can increase the width and height. Let’s
make it 30-meters in each direction:
<a-plane rotation="-90 0 0" width="30" height="30"></a-plane> |
Then we can apply an image texture to our ground:
<a-assets> |
To tile our texture, we can use the repeat attribute. repeat takes two
numbers, how many times to repeat in the X direction and how many times to
repeat in the Y direction (commonly referred to as U and V for textures).
<a-plane src="#groundTexture" rotation="-90 0 0" width="30" height="30" |
Tweaking Lighting
We can change how the scene is lit by using <a-light>s. By default
if we don’t specify any lights, A-Frame adds an ambient light and a directional
light. If A-Frame didn’t add lights for us, the scene would be black. Once we
add lights of our own, however, the default lighting setup is removed and
replaced with our setup.
We’ll add an ambient light that has a slight blue-green hue that matches the sky. Ambient lights are applied to all entities in the scene (given they have the default material applied at least).
We’ll also add a point light. Point lights are like light bulbs; we can position them around the scene, and the effect of the point light on an entity depends on its distance to the entity:
<a-scene> |
Adding Animation
We can add animations to the box using A-Frame’s built-in animation system. Animations interpolate or tween a value over time. We can set the animation component on the entity. Let’s have the box hover up and down to add some motion to the scene.
<a-scene> |
We tell the animation component to:
- Animate the entity’s object3D’s position’s Y axis.
- Animate to
2.2which is 20 centimeters higher. - Alternate the dir (direction) of the animation on each repeated cycle of the animation so it goes back and forth.
- Last for 2000 millisecond dur (duration) on each cycle.
- Loop or repeat the animation forever.

Adding Interaction
Let’s add interaction with the box: when we look at the box, we’ll increase the size of the box, and when we “click” on the box, we’ll make it spin.
Given that many developers currently do not have proper VR hardware with controllers, we’ll focus this section on using basic mobile and desktop inputs with the built-in cursor component. The cursor component by default provides the ability to “click” on entities by staring or gazing at them on mobile, or on desktop, looking at an entity and click the mouse. But know that the cursor component is just one way to add interactions, things open up if we have access to actual controllers.
To have a visible cursor fixed to the camera, we place the cursor as a child of the camera as explained above in Parent and Child Transforms.
Since we didn’t specifically define a camera, A-Frame included a default camera
for us. But since we need to add a cursor as a child of the camera, we will
need to now define <a-camera> containing <a-cursor>:
<a-scene> |
If we check the documentation of the cursor component that
<a-cursor> wraps, we see that it emits hover events such as mouseenter,
mouseleave as well as click.
Event Listener Component (Intermediate)
One way to manually handle the cursor events is to add an event listener with JavaScript just like we would with a normal DOM element. If you aren’t comfortable with JavaScript, you may skip to Animating on Events below.
In JavaScript, we grab the box with querySelector, use
addEventListener, and then setAttribute
to make the box grow its scale when its hovered over. Note that A-Frame adds
features to setAttribute to work with multi-property components. We can pass
a full {x, y, z} object as the second argument.
<script> |
But a much more robust method would be to encapsulate this logic into an
A-Frame component. This way, we don’t have to wait for the scene to load, we
don’t have to run query selectors because components give us context, and
components can be reused and configured versus having an uncontrolled script
running on the page. And better yet would be to skip calling .setAttribute
and set the value on the this.el.object3D.scale directly for performance.
<script> |
We can attach this component to our box straight from HTML:
<script> |
Animating on Events
The animation component has a feature to start its animation when the entity an
event. This can be done through the startEvents attribute, which takes an
comma-separated list of event names.
We can add two animations for the cursor component’s mouseenter and one
mouseleave events to change the box’s scale, and one for rotating the box
around the Y-axis on click. Note that an entity can have multiple animations
by suffixing the attribute name with __<ID>:
<a-box |
Adding Audio
Audio is important for providing immersion and presence in VR. Even adding
simple white noise in the background goes a long way. We recommend having some
audio for every scene. One way would be to add an <audio> element to to our
HTML (preferably under <a-assets>) to play an audio file:
<a-scene> |
Or we can add positional audio using <a-sound>. This makes the sound get
louder as we approach it and get softer as we distance from it. We could place
the sound in our scene using position.
<a-scene> |
Adding Text
A-Frame comes with a text component. There are several ways to render
text, each with their advantages and disadvantages, A-Frame comes with an SDF
text implementation using three-bmfont-text that is
relatively sharp and performant:
<a-entity |
Play With It!
And that’s the basic example!