Image Tracking and Location-Based AR with A-Frame and AR.js 3
We’re happy to announce AR.js 3 and A-Frame integration featuring new image and location based tracking.
For detailed API reference and source code check the official documentation and the Github repository
Getting Started with Image Tracking
The new AR.js tracking can take any arbitrary image or drawing (not only markers) to position and display your 3D content.
You just need a high resolution image with a good amount of detail. The more complexity in the image the better the tracking. Learn how to choose images for best results in this article by Daniel Fernandes.
For this tutorial we will use the following image:
![]()
Creating Image Descriptors
Next step is to create image descriptors: a set of files that describe your image and are needed by the tracking algorithm. We will use the NFT Marked creator available via Web (also available locally as a node.js script if you prefer). Upload your image and click “generate” to create the descriptors. Once the image is processed three files will automatically download. Copy the following snippet of code on a new HTML file and host it on a server. Also a Codepen with all the necessary code is available below for convenience.
|
Point <path-to-your-image-descriptors> to the path containing the Image
Descriptors you generated and downloaded before. Those files will have a common
name. Remove the file extension (e.g. with “dinosaur.fset”, “dinosaur.iset” and
so on, the path you have to add should end with “dinosaur”).
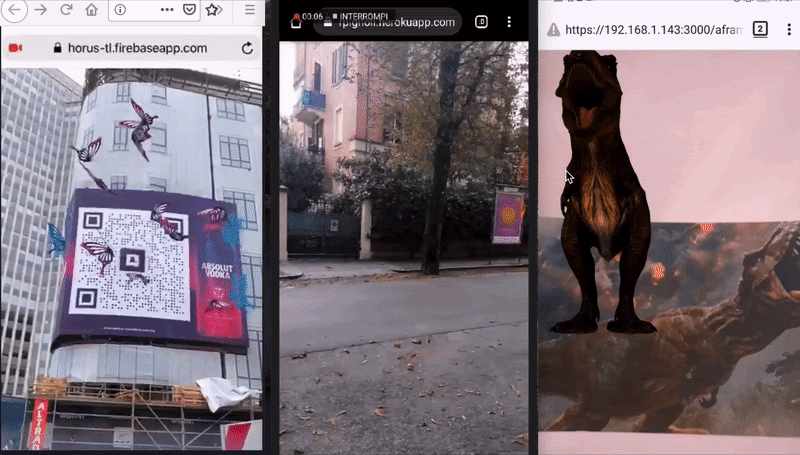
Serve the example from a local or remote server: Github Pages and Glitch are free and convenient options. Navigate to the URL on your device and you should see a T-Rex model after the loading screen disappears.
Visit this Codepen if you want to see right away how it looks without hosting your own.
You can replace the model above with any other assets: 2D videos, images, audio
files. Any A-Frame a-entity is a valid child of the a-nft anchor.
Location-Based AR
Location-based tracking uses real-world coordinates to place AR content in context. Users can move freely (outdoors for better precision) and content associated with their location will be scaled and placed accordingly (e.g: content will render bigger / smaller based on distance to the user). With AR.js and A-Frame is now very easy to build experiences like cities and museum tours, restaurant guides, treasure hunts, biology or history learning games or place virtual art on any real world location.
The following example shows how to place text on a fixed position in the real world. The text will remain in place as you move around. The content is anchored to your current location. Make sure that GPS tracking is enabled on your device before you try.
|
Some notes:
- Replace
<add-your-latitude>and<add-your-longitude>with your GPS coordinates. There are several online services that lets you retrieve those data for free like latlong - Change the
scaleproperty according to the distance of the place you specified with the coordinates: if you are not seeing the text, try to scale it up or choose a place much near - We used the custom
look-atA-Frame component, that makes the content always look towards the user camera. This is fundamental, in particular for 2D content as text.
Run the example on your device with GPS data on and you should be able to see the text fixed in place. Its position should honor the real-world positioning according to the GPS coordinates you added.
Unleash your creativity and replace the text with any content you like, thanks
to A-Frame you can quickly display 3D models, videos, images: Any a-entity
will be tracked as expected..
You can find additional support on the resources linked below and also on the official Gitter channel.
Have fun and please share the AR experiences you built with AR.js and A-Frame. We will love to check them out!
Nicolo Carpignoli and Diego Marcos.